





Products & stock
Review replenishment, location-balancing and product-copy suggestions.
TERMINALERP AI ASSISTANT
There is a lot of small work behind a working day: checking receipts, finding overdue invoices and getting ready to speak with a customer. Bring AI assistance closer to those tasks in TerminalERP, with a supported provider connected through your own API key.
Joining creates no subscription or ERP account. Compare plans to find the right fit for your work and team.

Connect a provider you prefer
Connect OpenAI, Claude, Gemini, DeepSeek or Groq for tasks supported by that connection. Check the configured provider and task requirements before beginning.
Support varies by task. The receipt-image workflow requires an image-capable connection; DeepSeek and Groq are text-only in this workflow.
Your workspace. Your connection.
An authorised administrator connects the company workspace to a supported provider using the company’s API key. Team members use available tasks within their permissions. Provider selection follows the workspace configuration; this is not a separate employee key or per-message model picker.
An API key is the credential that lets TerminalERP request assistance from a provider account. Keep it private and add it only inside the application’s authorized settings.

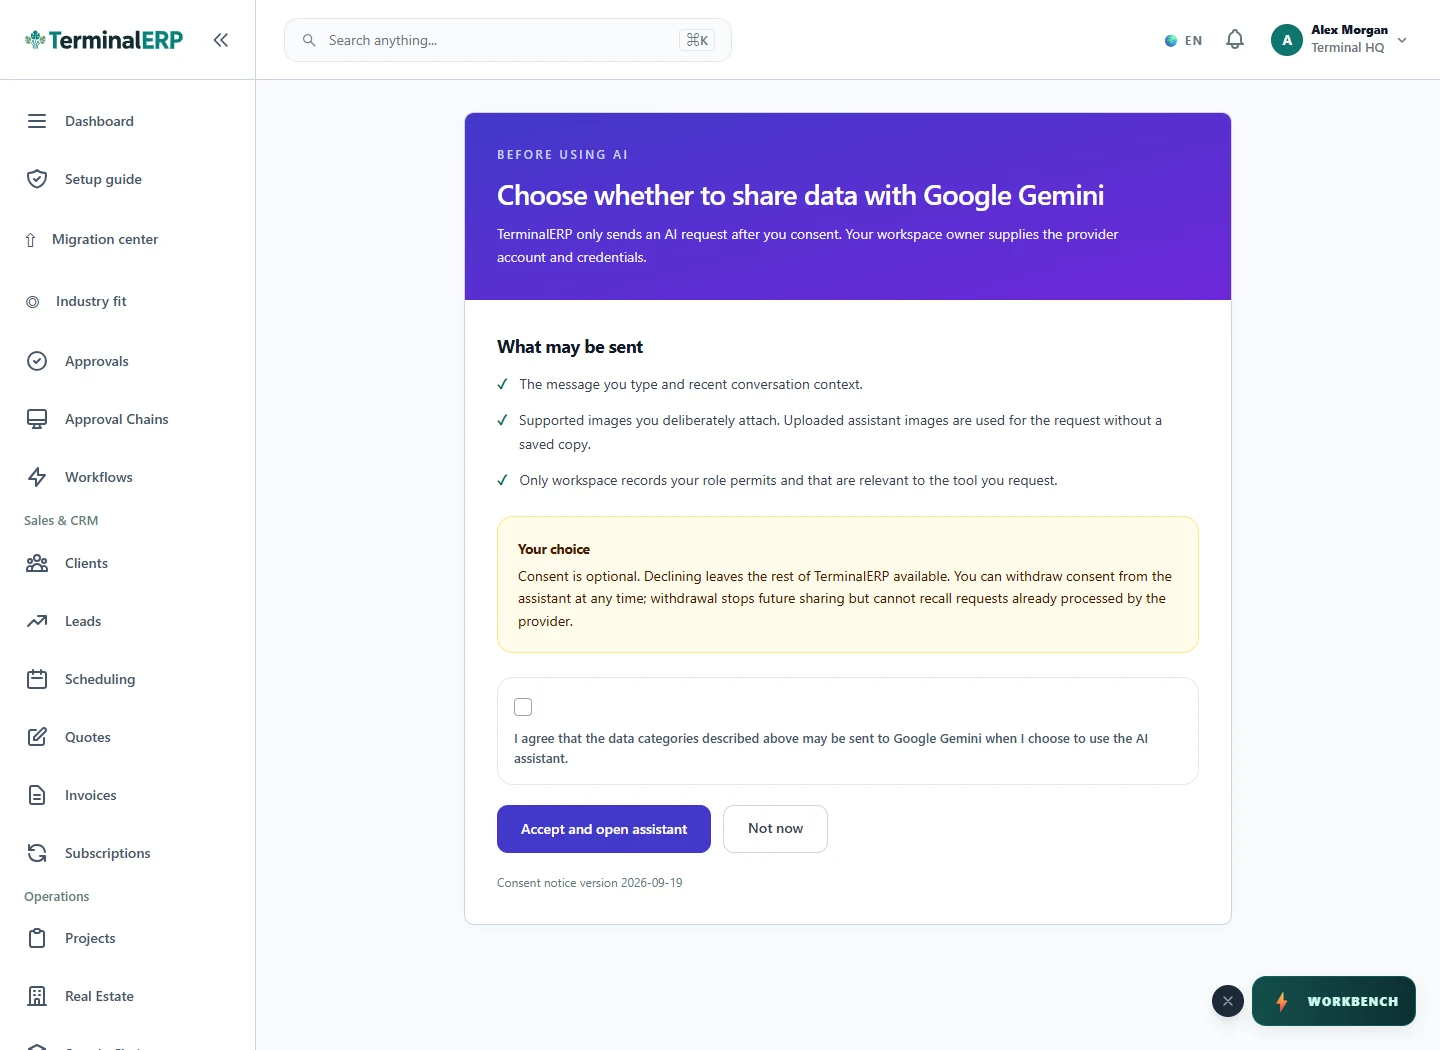
Show users what may be shared with their chosen AI provider before the assistant can receive workspace context. The interface shown below is a current product capture from the populated fictional TerminalHQ demonstration workspace.
Everyday assistance
Read & prepare
Receipts should not stay buried in a bag or camera roll. Upload a supported receipt image and let AI help identify the details needed for an expense record. Check the result against the original, make any corrections and confirm it through the available workflow.
Use a supported image-capable provider and check the extracted details against the original receipt before confirming.

Find & review
When the day gets busy, follow-up is easy to postpone. Ask for overdue invoices and bring the relevant records into view. Decide who needs a call, which account needs checking and what to do next.
A clearer starting point for your follow-up, with the invoice records close at hand.
Find the record.
Choose the next step.
Context & judgement
Use a short AI summary of selected customer information and invoice records to get your bearings. Check the underlying details, add what you know about the relationship and plan your next conversation.
Helpful context, with your judgement still doing the important work.
Get the context.
Bring your judgement.
Confirm & act
Describe the invoice you want to prepare using your existing customer and product records. Check the proposed lines, dates, amounts and applicable tax before confirming the action. Open the resulting invoice to continue your normal billing workflow.
Available invoice types and item limits depend on the workflow. Sending an invoice and collecting payment are separate actions.

Find & explain
Choose a date range and run a scan over your expense records. Review possible duplicate or unusual-amount findings alongside the supporting records. Mark a finding resolved after you investigate it.
A flag is a suggestion to review, not proof of wrongdoing. The scan does not correct or delete financial entries for you.

Draft & suggest
Prepare useful starting points for business documents, proposals, product descriptions and customer messages. Give the tool the right facts, then review and edit its output. Industry-specific templates help structure sponsorship proposals, engagement letters, course renewal notices and appointment reminders.
You review, edit and choose how to use each draft. Drafts are not automatically sent, published or professionally certified.

Your industry. Your context.
For product businesses, review stock replenishment and location-balancing suggestions. For service teams, prepare project and client documents. For operations teams, compare costs or inspect scheduling and maintenance information. Review the business records or inputs behind each recommendation before deciding what to do.
Review replenishment, location-balancing and product-copy suggestions.
Prepare proposals, compare costs and review project information.
Inspect maintenance, scheduling and recipe-cost information.
Confirm & act
Prepare a payroll action using your employee records and review the totals before confirmation. Authorized administrators can prepare a new access role, review the permissions and confirm its creation.
Recording payroll does not transfer wages through a bank. Creating a role does not assign it to colleagues. Access depends on your permissions and workspace.

Find & explain
In an eligible setup, request an internal management summary for the supported entity scope and period. Review the underlying posted records and same-currency reporting basis. Confirm entitlement and workflow availability before relying on a group result.
This supports internal review and is not an audited or certified statement. Enterprise entitlement and supported reporting scope apply.

Create or use an API account with a supported provider and obtain a key from that provider.
Have an authorised administrator save the company API key in workspace AI settings and review the available data-sharing consent.
Choose an available task, check the result and confirm supported actions when prompted.
API access and charges are governed by your provider’s terms. Do not assume a consumer chat subscription includes API usage. Check the provider account connected to your key.
Review the available data-sharing consent before use. Relevant authorised records, your prompt and supported uploads may be sent to the provider. The general assistant retrieves a limited set of permitted records when needed instead of sending the whole catalog at the start. General employee lookup excludes salary, but prompts, uploads and specialised actions can still contain sensitive information. Review provider terms and use the available consent-withdrawal controls when needed.
AI can make mistakes. Check extracted details, summaries and suggestions against your records before relying on them. Supported record-creation actions may ask you to review and confirm the proposal.
Start with a receipt, an overdue invoice or your next customer conversation. Connect a supported provider and take the next step in TerminalERP.